iMovR Keyboard Tray Adapter Kit for Standing Desks Review
- Lab tested
Like most reviews sites, our editorial staff and laboratory testing expenses are partially offset by earning small commissions (at no cost to you) when you purchase something through those links. Learn More

Overview
| Review Summary |
What to do when you want to take a conventional keyboard tray off your old fixed-height desk and transfer it to your new standing desk instead? iMovR’s Keyboard Tray Standing Desk Adapter Kit does exactly what it sets out to do by offering an affordable, easy workaround to the common issue of incompatibility between ergonomic keyboard trays and crossbar-equipped adjustable-height desks. And it does this without sacrificing any adjustability or stability. |
|---|---|
| Best Use |
Anyone looking to add a conventional keyboard tray to a standing desk. |
| MSRP / List Price | $39 |
| Street Price | iMovR’s exclusive offer for WorkWhileWalking readers – Get 15% off everything in your cart with the coupon code WWW15 |
| Shipping |
Free |
| Warranty |
15 years |
| Colors Available |
Black |
| Minimum Height |
1″ |
| Maximum Height |
2.2″ |
| Where to buy |
Buy on iMovR |
Rating
| Ease of Assembly | |
|---|---|
| Reliability | |
| Customer Experience | |
| Ergonomics | |
| Value | |
| Positives | It solves a huge problem for anyone looking to add an ergonomic keyboard tray to an adjustable-height desk. A simple design means there isn’t much to go wrong and there won’t be extra instability added to the system. |
| Negatives | The negatives associated with this adapter are the same as any keyboard tray that requires drilling holes in the underside of your desktop. Adding these spacers adds slightly to the complexity of an already complex assembly task. |
Bottom Line
We’ve seen many adjustable keyboard trays that are solid on their own, but simply don’t work with adjustable-height desks because their slide rail is too long. Most adjustable-height desks have a crossbar under the desktop to add stability and it usually poses an obstacle to installing the slide rail.
There are keyboard trays designed specifically for adjustable-height desks, like the iMovR SteadyType Exo, Humanscale Float, iMovR Trackless, and iMovR Stowaway, that we’ve also reviewed. But if you already have a traditional keyboard tray that you really want to transfer over to your standing desk, this adapter kit will let you do it.
For many years, the common workaround for installing a conventional keyboard tray on a stand-up desk was to install the rail sideways (parallel to the front edge of the desk). This approach succeeds in getting the keyboard tray attached to the desk, but it ostensibly eliminates the ability to slide it back under the desk when you’re not using your computer. For trays that have the ability to pivot 360° you can at least rotate your tray out of the way, assuming your desk is wide enough to make way for it.
All this is to say: While the workaround technically works, it doesn’t always work terribly well on all standing desk configurations and keyboard tray models.
That’s The Problem, Here’s The Solution
iMovR’s Keyboard Tray Adapter Kit For Standing Desks contains three brackets that attach between the underside of the desktop and your keyboard tray rail to lower it and avoid that pesky crossbar. This of it as sort of an inverted highway overpass to get around the crossbar obstruction. It’s an impressively simple solution.
The included spacers can range from 1” to 2.2” of extra space, enough to get around the crossbars of virtually every standing desk design we’ve seen in the past ten years.
The brackets will fit any keyboard tray rail 5 ⅛” or smaller, making it compatible with 95+% of all keyboard trays. There might be some super cheap, Chinese-made keyboard tray models sold on Amazon that don’t use this standard rail width, but they are rare. It turns out most keyboard tray manufacturers buy their rails from the same manufacturer, the only differences between them being their length (typically 17” – 23” long).
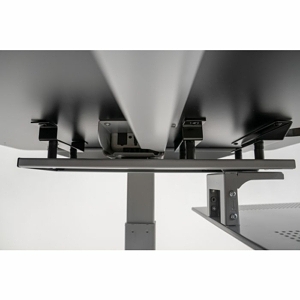 In this example shown installing an iMovR retractable “tech dock,” which uses the same kind of sliding rail as a keyboard tray.
Installation
First you measure the height of your crossbar to determine how much clearance you need, then assemble the spacers and screws to get the correct amount of clearance. Next you attach the brackets to the keyboard tray rail. Finally, you attach the entire assembly to the underside of your desk. This final step is the most difficult. You need to position the assembly where you want it, mark the holes, pre-drill the holes, and then screw it in.
There are the usual words of caution when installing anything that requires you to drill holes in your desk. This method will result in a very secure connection but carries obvious risks, like drilling too far and penetrating the surface of your desktop (if this makes you nervous you can always invest a few dollars in a drill bit with adjustable depth). The wood screws in this spacer kit are less than ¾” which is short enough to not drill through any common desktop surface.
Anyone using this adapter kit was already going to need to drill holes to install their keyboard tray, but it’s worth repeating this warning. Especially with the spacers being used, we would strongly recommend not trying to use self-driving wood screws when installing a keyboard tray; just bite the bullet and pre-drill the pilot holes.
Bottom Line
This keyboard tray spacer kit takes some of the stress out of picking out your keyboard tray since you don’t have to worry about the available space for the rail (especially since some manufacturers list the rail length incorrectly and some desk manufacturers don’t provide accurate drawings of the underchassis of their standing desks). It also lets you pick a keyboard tray on its own full merits rather than one simple dimension.
There’s not much to review here, other than the idea itself. And the idea works. For a reasonable price, you can get around one of the most common and annoying parts of adding a conventional keyboard tray to any adjustable-height desk.


0 Comments
Leave a response >