Fellowes Professional Series Sit / Stand Keyboard Tray Review
- Lab tested
Like most reviews sites, our editorial staff and laboratory testing expenses are partially offset by earning small commissions (at no cost to you) when you purchase something through those links. Learn More

Overview
| Review Summary |
The Fellowes Professional Series Sit / Stand Keyboard Tray claims to be a standing desk converter in addition to a traditional tray—it might be, but only for the shortest among us. Stability problems keep us from recommending this type of product as a go-to enabler for standing, but there are niche cases where it could work. |
|---|---|
| MSRP / List Price | $274.34 |
| Street Price | Scan for available discount deals |
| Shipping |
Free 2-day shipping with Amazon Prime |
| Warranty |
Lifetime limited warranty |
| Adjustment Range |
Keyboard tilt: -15° |
| Dimensions |
Keyboard tray: 19” x 10.5”; Mouse platform: 10″ diameter |
| Product Weight |
17.5 lbs |
| Competition | Top-Rated Ergonomic Keyboard Tray Reviews |
| User Reviews | See reviews on Amazon |
| Where to buy |
Buy on Amazon |
Rating
| Expert Rating | |
|---|---|
| Stability | |
| Reliability | |
| Innovation | |
| Value | |
| Positives | Fellowes is a well-known of low-cost office accessories and peripherals, and they offer a lifetime warranty on this product. This product is well-made, and delivers all the expected functions of an ergonomic keyboard tray, plus the unique function of going 6” over your desktop. |
| Negatives | Its design inherently renders the tray less stable than smaller arms. Installation was moderately difficult, and the functionality is more than a little niche. |
Bottom Line
Review
The Long Arm of Ergonomics
Not to be confused with Fellowes’ line of Sit / Stand converters or their other Professional Series keyboard trays, the Professional Series Sit / Stand Keyboard Tray claims to be designed for the ergodynamics of working “in a sitting or standing position,” and we at WorkWhileStanding & WorkWhileWalking were intrigued. A keyboard tray generally helps to facilitate proper wrist and arm ergonomics, but it needs to be attached to a full standing desk to create a complete ergonomic workstation. And with a 22” rail, this tray was clearly made for standard fixed-height desks, not adjustable-height standing desks.*
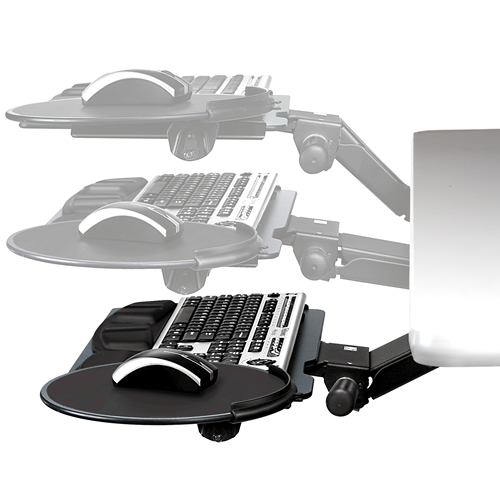
It turns out that the keyboard arm is actually the Humanscale 4G, an older arm design from a high-end manufacturer, paired with Fellowes add-ons. The 4G is longer than most keyboard arms, with the unique ability to reach 6” above your tabletop. And while we’re big fans of Humanscale‘s ultra-adjustable (albeit high-priced) keyboard trays, we have always relegated this particular line of arms to the novelties pile (also of note: Humanscale.com no longer includes this arm in its keyboard tray configurator.)
One such use would be a tall treadmill desker who requires a higher keyboard, even when their desk is at maximum height (remember, the treadmill adds 5 about inches.) Anyone who wants their keyboard higher than their existing desk can reach should be interested in this tray. That said, there are several desks on the market today designed specifically for taller users and treadmill desk users that’ll offer a much more stable and ergonomic solution if you’re in the market for a new desk, like any desk with SteadyType technology.
Unboxing and Installation
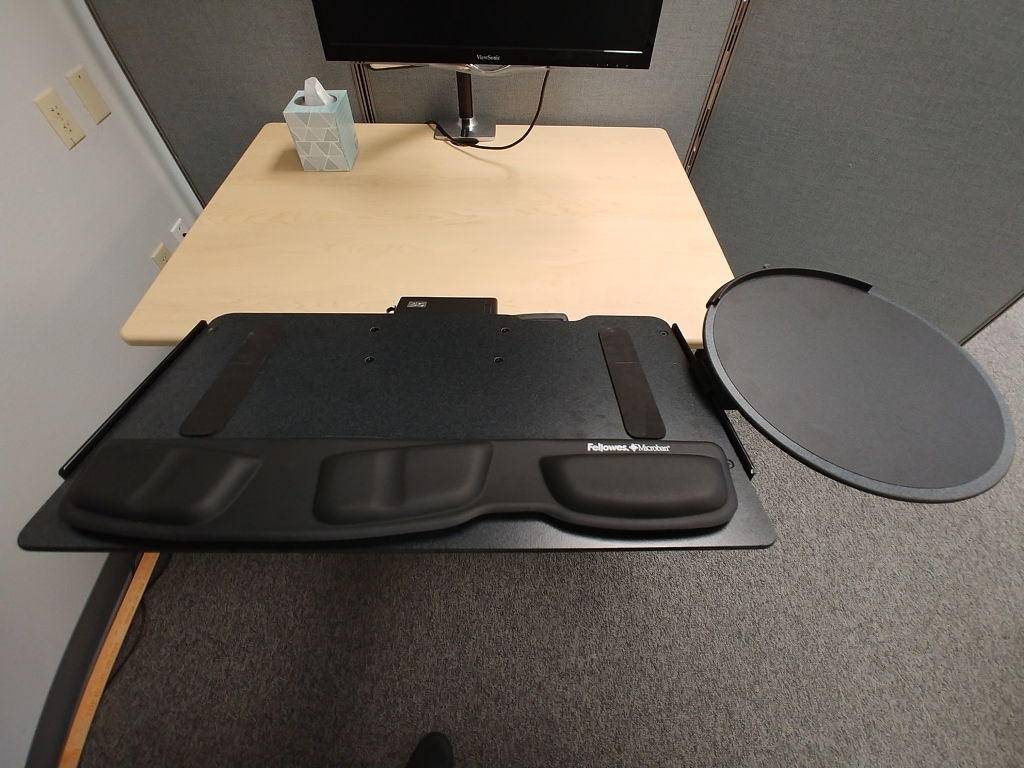
The installation of this product was somewhat difficult, but not the worst we’ve seen. The keyboard arm itself ships already slotted into the tray, as most do, but we found this one to be especially hard to remove out of the track, which is a necessary step prior to installation. The arm is just harder to slide along the track than other trays, an issue that persisted even after the installation was complete.
While many manufacturers opt to include a mounting template for pilot holes, Fellowes instead gives you a more convenient adhesive strip that attaches the track to the bottom of the desk so you can drill your holes and screw it in directly, a small but nice innovation that we applaud. The usual process of drilling pilot holes and screwing in the tray followed. Attaching the keyboard tray platform to the arm was relatively easy, requiring no more than a screwdriver; the same was true for attaching the mouse platform. Overall, it was a somewhat tedious experience, but candidly not any more difficult than an average tray. (If you want to steer clear of any installation look for clamp-on keyboard trays like the iMovR SteadyType Exo.)
The Nitty Gritty
The Sit / Stand is a well-put-together tray, backed by a superb lifetime warranty, like all Humanscale trays. We have no doubt that this product is built to last. The phenolic tray and large mousepad feel solid. The mousepad is also of the “swiveling lily pad” variety, with independent tilt adjustment, which we strongly prefer—the ability to swing your mouse closer to your body reduces the need to reach, saving you from straining your elbows and shoulders in the long run.
Adjusting the tray height couldn’t be easier. It uses a “lift and lock” mechanism, with no lever, and the movement is effortlessly smooth. It’s one of the easiest trays to adjust of all the ones we’ve tested over the years. It also supports a pretty conventional -15° of tilt. You can definitely use this product as an ergonomic keyboard tray—that is to say, even if you’re not using it above your desk, you get the crucial benefit of ergonomic tilt to reduce wrist strain.
However, the physics of a large platform attached to a long bar don’t work in the tray’s favor. We noticed a fair amount of movement while typing, which would be magnified if typing while on a two-legged standing desk, much less any treadmill desk. We even saw some torsion on the keyboard arm at max height. The equipment and manufacturing standards are high—the fault lies in the design itself, which brings us to our next point.
“Negative Tilt” Explained
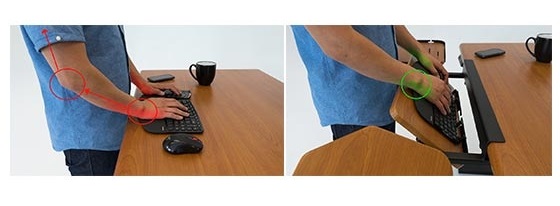
This is perhaps the single most important concept that users, and even salespeople and websites that sell keyboard trays, get reversed in their minds, and it’s easy to understand why this happens. The very word “negative” sounds counter-intuitive. But, in fact, it’s a negative tilt, as shown in the photo on the right, above, that you want to achieve with an ergonomic keyboard tray. The only application for positive tilt is typically for gamers who want to lean way back in their chairs and still be able to see and reach their keyboards.
In general, keyboard trays allow you to tilt the edge of your keyboard that’s closest to the user up, bringing it into a negatively-inclined position from the perspective of where your wrists are resting on the user edge of the keyboard. While this may depart from old-school, pre-ergonomic keyboard design (pop-up tabs on many keyboards used to let you elevate the back—a humongous ergonomic no-no) it’s actually ergonomically proper to tilt the keyboard the other way.
It’s only by placing the keyboard at a negative tilt that wrist flexion—and consequent squeezing of the carpal bones that surround the nerves and blood vessels that pass through them—can be neutralized. We’ve never been able to figure out how the computer industry started down this path of tilting keyboards in exactly the opposite direction as is ergonomically correct; the myth has persisted for decades and millions of computer users are still unaware.
No Ideas But In Things
The Sit / Stand Keyboard Tray caught our attention with its innovation and design—we love the idea behind it. It doesn’t aim to do what most ergonomic keyboard trays do, and we’re all about products that break the mold. Standing desk converters are one of the largest growing sectors in the office fitness industry, and only a rare few are based on under-desk mounted keyboard trays. As it turns out, there might be a reason for that.
When you raise up a traditional on-desk standing desk converter, you bring your monitor with it. When you raise your Sit / Stand keyboard tray, you do not. This makes transitioning between sitting and standing, at best, a two-step process (in which you raise your tray and your monitor arm,). At worst, it makes it impossible (due to your tray, monitor arm, or both not going high enough.) The tray can only elevate six inches above the surface of your desk, which will not be enough for taller users.
Let’s compare that to the iMovr Ziplift, whose keyboard tray can elevate up to 14.6” from the surface of your desk, and whose work surface (on which the monitor or monitor arm can rest) elevates 20”. The Ziplift’s keyboard tray would be 7” higher than the Fellowes Sit / Stand, and your monitor would be a full 20” higher—since the Sit / Stand cannot magically levitate your monitor. To use the Sit / Stand in the way that its name implies, you’re going to need an extra-tall monitor arm, and you’re going to need to be on the shorter side. Otherwise, you’ll be looking down at your screen, which leads to neck strain. At $299 retail the ZipLift actually costs almost the same as the Fellowes Sit / Stand, challenging the logic of adding such an expensive peripheral to only solve half of the problem.
The Takeaway
Ask yourself why you’re interested in this product. If the answer is that you want to convert your desk into a sit-stand workstation with one fell swoop, you should look elsewhere. If the answer is that you want a premium under-desk keyboard tray for ergonomic typing, it’ll do the job, but it’s not the best choice. This tray is for corner cases, like a tall treadmill desker, or anyone else who wants their keyboard higher than their desktop. Given its stability issues, we really can’t recommend it for treadmill desk users, which is a shame, because it would otherwise be a good solution (read our primer on adding an adjustable keyboard tray to a treadmill desk for more information). It has its purpose in the market, but a revolutionary standing desk converter it is not.
*To avoid the crossbars on a standing desk, the Fellowes Sit / Stand can be installed with the track sideways, rather than front to back as the manufacturer intends. It will take some very slight modifications though. We recommend installing the track right at the edge of your desk so you can use the arm at its maximum height. This will mean forgoing the “stopper” that keeps the tray from going off the rails—you should be able to use a regular screw instead, but test it and make sure it’s secure so you don’t accidentally slide your tray off. For more on the challenges of adding an adjustable keyboard tray to a standing desk, check here.
Want to check out more ergonomic keyboard trays? See our comparison review of the most popular models.
What to do when you want to take a conventional keyboard tray off your old fixed-height desk and transfer it to your new standing desk instead? A common issue that people have when installing keyboard trays on standing desks is being incompatible with the crossbar under adjustable-height desks. iMovR’s Keyboard Tray Standing Desk Adapter Kit offers an easy workaround to this problem without sacrificing any adjustability or stability
Articles About Keyboard Tray Ergonomics That Will Interest You
• How To Avoid Carpal Tunnel Syndrome, Neck Pain And Shoulder Spasms While Typing
• How To Set The Proper Keyboard Tray Height For Maximum Ergonomic Benefits
• Is A Sedentary Desk Job, The Most Dangerous Job In The World?
• What Employers Urgently Need To Know About Kitchen Table Ergonomics

0 Comments
Leave a response >